pages

Monday, March 31, 2014

5 Ways to Get Gorgeous Hair — Fast!

Even if your mornings are too hectic for blow-drying and fussing with flatirons, these snappy hairdos can make it look as though you had time to spare.


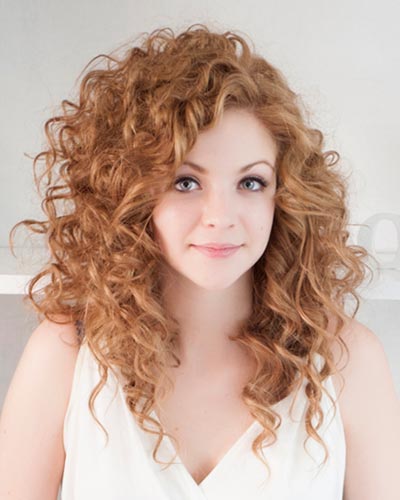
Style 1: Defined (Natural) Curls in 4 Minutes 

This is one for the already-curly girls. Because spirals lack moisture, the key to a soft, frizz-free feel is hydration.
• When you get out of the shower, immediately apply a moisturizing leave-in conditioner before towel-drying. That gives a soft foundation, so any styling product you use afterward won’t dry with a crunchy or tacky feel. Blot excess water with a damp towel.
• Next, divide hair into four sections and apply a quarter-size dollop of a water-based gel to each, raking fingers through to evenly distribute the product. Using the same towel, begin scrunching each section: Lift hair from ends to scalp, scrunch once and drop.
Then hands off! Too much touching roughs up curls and creates frizz. For the softest bounciest results, let hair air-dry. 


Style 2: Voluminous Bounce in 5 Minutes

One of the easiest ways to cut your morning styling time? Prep hair the night before: Wash with a volumizing shampoo, then apply a light conditioner (to ends only) and rinse thoroughly.
Next, blow-dry hair until it’s 90 percent dry. Section hair from ear to ear, and divide the front into three smaller pieces (one on the top and one on each side). Wrap each of those around Velcro rollers to create lift; twist the bottom section into a bun and secure with pins.
• When you wake up, before taking out the rollers, blast hair for two minutes with your blow-dryer to set the style. Mist roots with a dry shampoo for added volume. Flip head upside down and tousle. Voila: Amazing body and bounce. 


Style 3: A Chic Chignon in 6 Minutes

It’s easy to go sophisticated with a bun, but stick to this casual version for a low-key daytime look. Start by spritzing roots with a volumizing spray. Massage it into your scalp with your fingers.
Gather hair into two loose ponytails at the nape of your neck, fastening them low (halfway down) with an elastic. Begin rolling one ponytail toward your head until you reach the scallop, then secure with bobby pins. Repeat on the other side, making sure there isn’t a gap between the two; link them with a few hairpins.
Tuck and pink long layers into the chignon, pulling out a few strands of hair around your hairline and ears for a slightly winsome look. Finish with hairspray. 


Style 4: A Polished Ponytail in 7 Minutes

Forget the ponytail-as-afterthought. Instead do a quick tease for an easy retro-glam version. Start by creating a deep side part, then tuck face-framing strands behind your ears.
Now, starting at your crown, begin teasing tresses: Hold up a 1-inch section of hair, pulling it forward, and spritz with hairspray. Using a teasing brush with boar bristles, slowly brush hair from midshaft to roots about three times. Spray with hairspray before letting it fall.
• Repeat until you’re 3 to 4 inches from your hairline. Comb a small section of hair from the front over the pouf. Smooth, being careful not to comb out the volume. Gather everything back into a ponytail. Secure with a clear elastic. 


Style 5: Cascading Waves in 8 Minutes

• Believe it or not, this soft, tousled look is easy to ace, even if you have stick-straight or fine hair. First, brush out any tangles and kinks. Then begin wrapping large sections—about 2 inches for finer hair and 1 inch for thicker hair—around a tapered, clampless curling wand.
• The twist: Instead of wrapping hair flat around the barrel, loosely twirl each section of hair; this creates soft, undone texture. Continue working around your entire head, rotating the curls in different directions (toward the face and away).
• When finished, let curls cool for a minute and top with a light-hold hairspray. Comb fingers through to break up the curls. Flip head upside down and sprtiz again for extra volume.

11 Makeup Tips That Nobody Told You About PART 1


With a few tips and tricks, you don’t have to be a professional to have fabulous looking makeup. It’s taken me years to learn my face shape, what colors flatter me, how much to apply, and how to apply it so that it looks beautiful and natural. But, I think I’ve finally perfected my morning routine! You don’t have to spend hours doing it, either. Once you have the know-how, you’ll see just how much makeup can accentuate your best features and hide those that aren’t as favorable. Here are a few makeup tips and tricks that you’ll wish you had known a long, long time ago!


1. Repurposed Plastic Spoon

Use a plastic spoon to easily apply mascara on your bottom lashes without getting any on the skin under your eyes. It also helps you to accomplish a much thicker coat.

32 Makeup Tips That Nobody Told You About


2. Blush For Your Face Type

In order to apply blush where it will be most flattering on you, first determine your face shape. Blush not only adds color, but also contours and defines your cheek bones. The way you apply your blush can accentuate your best features and also soften those that are perhaps too prominent.


3. Scotch Tape Eye Stencil

This unconventional beauty aid will help guide you when applying eye liner and shadows, especially if you’re going for a more daring look such as the “cat eye”. It will also help you achieve an even and balanced look for both eyes.

32 Makeup Tips That Nobody Told You About

4. Eye Highlights

The placement of highlights is very important when trying to create naturally beautiful eye makeup. Your lighter colors (whites, creams, and pearls) should be applied in the inner corners, the middle of the eye, and just under your brow bone. Apply your lightest colors first, and then move on to your darker shades.

32 Makeup Tips That Nobody Told You About

5. How To Fix Clumpy Mascara

Let’s face it, this happens to every tube of mascara over time. The problem is it dries out and then starts to form unattractive lumps. To help prevent this, don’t pump your mascara trying to get more on your wand; you’re basically pumping air into the tube causing it to dry out even faster.
Although mascara should be replaced every 3 to 4 months, I use to replace mine much sooner just because it dries out so fast and creates undesirable results. But, there’s an easy fix for that! Add a drop or two of Visine (or any brand of eye drops) into the tube, and then rub the wand around inside. The Visine softens the mascara liquid, making it apply as if it were a brand new tube!


6. Lipstick Ready

Use a baby toothbrush to exfoliate your lips. To really get the job done, you can make a homemade lip exfoliate with sugar and coconut oil, or easier but not as effective, cover your lips in lip balm or petroleum jelly before scrubbing.


7. Make Eyes Appear Bigger

If you don’t already own a white pencil, invest in one now just for this simple trick! Instead of lining your water line with dark eyeliner, use a white pencil to create the illusion of a bigger eye. If you squint your eyes a little at this picture comparison, you’ll see what a difference it really makes.
32 Makeup Tips That Nobody Told You About

8. Make Eyeshadows Pop

Have you ever purchased a vibrant color of shadow that once applied appears rather dull? The key to making those colors pop is a white base. Use a white eyeliner and cover your entire lid before applying the color of your choice.

9. Secret Eye Lift

Sweep a light pink matte pencil across the entire length of your brow bone to create the illusion of a higher arch, and then blend, blend, blend! It should not be detectable.
32 Makeup Tips That Nobody Told You About

10. The Lip Cheat

As it turns out, we weren’t all blessed with Angelina Jolie’s lush lips. Now, there are a few tricks to making them appear larger (a glossy lip being one), but for a more dramatic effect, don’t be afraid to line your lips just outside of your natural line. When I say just outside of your natural line, I mean slightly. You don’t want to look like a clown by over doing it!
32 Makeup Tips That Nobody Told You About

11. Make It Last

Keep those lips kissable by sealing the deal. After your lipstick is applied, hold a tissue over your lips and apply powder over the tissue. This creates a matte look that lasts much longer.


Sunday, March 30, 2014

How to lose that belly fat

Many people find that they have problem areas where they just cannot get fat to budge.  Hand’s up if you’re one of the millions who find themselves with a stubborn layer of fat around their waist?
It’s frustrating that, although you may be making an effort with your diet and trying to exercise more, sometimes it feels impossible to reduce fat around your belly. With an active lifestyle there are several steps you can take to help you become or remain trim all over.


Breaking down the fat loss myth

I’m sorry to say that there is no such thing as spot reduction, we just don’t get to choose where our body stores fat and we can’t remove it from particular places when we decide we don’t want it.  It’s a disheartening fact but hundreds of sit-ups and stomach crunches on their own won’t immediately help you lose that spare tire. The good news is that with diet and exercise together, you can burn your excess fat and by following my  three belly fat busting tips that spare tire will soon deflate.


Three simple tips to help you reduce the appearance of belly fat
Here are my three go-to belly busters that help keep me stress free and in control of my figure.

1. Make time to be active

Although you can’t spot reduce and only target a flabby tummy, you shouldn’t discount the benefits of general exercise.  If you can find time for a physical activity every day, then you’ll soon find yourself firming up all over.
I know you’ve heard it before but being active and becoming physically fit is also wonderful way to cut through the stress in your life.  Spending time exercising can give you a time out and help you reprioritize.   Even better, the time you spend exercising is time when you can’t be eating!

 2. Take a deep breath

Practice conscious breathing by inhaling through your nose and letting the air expand into your tummy, then breathe out through your mouth. Stopping work and taking 5-10 conscious breaths can calm your mind and give you a rejuvenating time out. Don’t let stress creep up and leave you feeling frazzled by the end of the day, that way may lead to comfort eating.  Try this breathing technique as often as  you remember (you may even want to stick up a post-it note to yourself).  Take the time to think about your body and how you want it to look.  This mindful technique may help you avoid a donut or re-prioritize a trip to the gym.


3. Pull your shoulders back and your tummy in

Schedule a stretching break instead of a coffee break. You can do simple stretches and exercises from the comfort of your office chair or while you’re on the phone.  Try pulling in your tummy when your sitting or standing for 30 seconds at a time and you’ll be strengthening your core stomach muscles. And, if you have a minute, then take a moment to stand up straight, pull your shoulders back and walk tall. Improving your posture can help make you feel more alert and in better shape.
***

Although there are no quick-fix solutions, you’ll instantly feel better if you begin to exercise, take control of your figure and make the time to think about you.  Whatever your problem area – be it a wobbly belly, thunder thighs or a double chin – with a consistent exercise routine and patience you can improve your physique.

4 beauty tips that require (almost) no effort

Do you want to look and feel just a little bit better today than yesterday but with minimal effort? We don’t have to go to extreme measures to achieve beauty; sometimes it’s the little things that make the biggest impact.


Here are a few simple at-home beauty tips I’ve come to love over the years that have definitely proved positive. 

Simple beauty tips with a big impact

1. Easy beauty tip: make nighttime skincare easily accessible

Don’t go to bed alone! Regardless of whether you’re male or female, you should always clean your face each evening. So, for those late nights when you just can’t muster up the energy to make it to the bathroom, reach towards your nightstand. Try keeping cleansing cloths, night cream and lip balm right next to your bed.
No matter how tired or, let’s face it – LAZY we are, we won’t fall asleep with a dirty face when our favorite products are within arm’s reach. Remember, doing SOMETHING is better than doing NOTHING. No one wants to wake up to dull skin and clogged pores.


2. Easy beauty tip: a steamy shower can be our best friend

Humidity, while not always great for our hair, is a good thing for our skin. Moisturizers are attracted to our skin most when it’s still damp from bathing. Combined with the humidity generated from a steamy shower, this is the best time to apply lotions for long lasting hydration. But you need to get started the minute you step out of the shower and before you open the bathroom door! If you wait too long to apply your moisturizer, the water will evaporate from your skin leaving it less receptive to hydration.
  
3. Easy beauty tip: get glamorous with some nice sheets or, at least, a nice pillowcase

Tired of waking up with sheet imprints on your face? I know I was! By simply changing to softer sheets, the problem will be gone! Silk or satin sheets won’t leave imprints on your skin. And, if you tend to sleep in the same position night after night, those skin creases just might start to become permanent. By changing to higher quality sheets, you can help prevent these imprints and fine lines.


Satin sheets and pillowcases are also great for our hair. Cotton pillowcases have a rougher surface and the friction caused by tossing and turning during the night can lead to unnecessary hair tangles and even breakage. By switching to satin, your hair will hold its style and will be much more manageable when you wake up in the morning.
And, the best part about switching to satin? You always wake up feeling sexy! Who doesn’t love the feel of silky satin against their skin? In the name of youthful looking skin and hair – go with satin!

4. Easy beauty tip: the one beauty tool all ladies need

There’s something that I just can’t live without and it’s my eyelash curler! I have yet to master the art of applying false eyelashes, so an eyelash curler is the next best thing. It takes just a few seconds each morning and it’s an inexpensive way to make a huge impact on our appearance. With just a little curl, your eyes instantly look bigger, brighter and more awake. It’s the simplest beauty trick for a big impact. (Men, I’m not saying you shouldn’t try this one but… you might find my other three beauty tips suit you a little more!)

***
These are just a few of my simple beauty tips with a big beauty impact. Will you have time to try them this week? Let me know which one works best for you.

Clean skin: 4 rules to live by

Clean skin is critical for clear skin. It’s the very first step in your daily skin care regimen. Here are four rules about cleansing that will help you look fresh every day.


The truth about cleansing your skin

1.  Clean skin is not gender biased

Yes gentlemen, that means you need to cleanse too.  I can’t tell you how many times I have heard from you guys, “But Jacquie, I don’t wear makeup and, when I look in the mirror, my skin looks perfectly clean”.  Sorry guys, just because you don’t wear makeup doesn’t mean your skin isn’t covered with bacteria and skin impurities.  Think about what we are exposed to on a daily basis – pollution, smog, cigarette smoke, car exhaust, aerosol sprays… and that’s just the beginning.  Just because you can’t see the dirt and grime at the end of the day, doesn’t mean it’s not there.  It needs to be washed off!

2. Night cleansing is imperative for healthy skin

Believe me, I am the first to admit that there are nights when I am just too tired at the thought of removing my makeup, and cleansing my skin seems like a monumental task.  But ladies, even if you have to crawl to your sink half-asleep to cleanse that makeup off – do it! Sleeping in your makeup can clog your pores and that can result in breakouts.  Unwashed skin can become a breeding ground for bacteria  and it will leave your skin looking dull.


3. Just because you cleansed your face the night before doesn’t mean you don’t need a morning wash too

It’s important to note that just because you go to bed with a freshly cleansed face that doesn’t mean you can skip the cleansing in the morning!  We need to remove any nighttime products we may have applied including night cream and eye cream.  Most importantly, our body, including the skin, works to repair itself when we’re sleeping.  During this time, the skin may secrete oils and other impurities that must be removed in the morning as they may prevent our daytime skin care products from working properly.
  
4. Find the right cleanser for your skin type

Most cleansers pretty much provide the same benefits to the skin: they remove dirt, oil, bacteria and makeup.  Cleansers can be formulated to target different skin concerns such as dry or oily skin and can come in an array of scents and textures.  If you have oily skin it is most common to use a ‘gel’ cleanser.  And, dry skin usually needs a ‘lotion’ style cleanser.


A good cleanser will target dryness by providing light moisture or will help remove excess oils by targeting sebum production.  (“Sebum” is just a fancy word that means oil.)

A good cleanser will never compromise your skin’s moisture barrier, or increase oil production.  So, no matter how tempting, don’t just grab a random cleanser off the shelf. Do some research, trial and error, and find what works best for your skin type.
Be good to your skin and your skin is more likely to be good to you!